High-quality light bulbs are strategically installed throughout the Kia Carnival to ensure optimal visibility, both
inside and outside the vehicle. These lighting systems are crucial for illuminating your path and signaling your
intentions to other drivers on the road, ensuring a safer driving experience in your Kia Carnival.
Bulb replacement precaution
It is recommended to always keep a set of spare bulbs on hand with the correct wattage specifications for your
specific Kia Carnival model, ensuring you are prepared for unexpected lighting failures during your travels.
For more specific details, please refer to the technical specifications section of your owner's manual.
Before attempting any lamp replacement, ensure the Kia Carnival is parked in a safe, level location. Engage the
parking brake firmly, switch off the ignition, and disconnect the negative (-) battery terminal to prevent any
accidental short circuits.
 WARNING
Working on the lights
Prior to performing maintenance on the lighting system, ensure the parking brake is fully applied and the ignition
switch (or ENGINE START/STOP button) is turned off. Always allow the bulbs to cool down before handling them to avoid
potential burns, and ensure the light switches are in the "OFF" position to prevent electric shock or accidental
vehicle movement.
Only use bulbs that match the exact wattage specifications outlined in your Kia Carnival service manual.
 CAUTION
Light bulb replacement
Always replace a burned-out bulb with a new one that features the exact same wattage rating. Using an incorrect bulb
may lead to blown fuses, melted wiring, or damage to the sophisticated electrical system of your Kia Carnival.
Ensure that all bulbs and their retaining clips are fully installed and securely locked into position. Improper
seating can cause heat buildup, potential fire hazards, or moisture intrusion into the headlight housing. Such issues
may result in lens condensation or permanent damage to the headlamp assembly. Always verify that bulbs are seated
firmly to maintain the integrity of your Kia Carnival lighting.
 CAUTION
Headlamp lens care
To preserve the clarity and structural integrity of the headlamp lens, avoid using chemical solvents, abrasive
cleaners, or harsh detergents, which can cause clouding or cracking.
 NOTICE
-
If a bulb or connector is disconnected while the lights are active, the onboard electronic control system may
log a fault. This may be stored as a Diagnostic Trouble Code (DTC) in the Kia Carnival fuse box system.
-
It is perfectly normal for a functioning lamp to flicker momentarily upon activation. This is due to the
stabilization function of the Kia Carnival electronic control unit. If the lamp illuminates steadily after this
brief blink, it is operating as intended.
However, if a lamp continues to flicker repeatedly or fails to turn on at all, there may be a defect in the
control module. In such cases, have your Kia Carnival inspected by an authorized dealer immediately.
 NOTICE
Following any accident or the removal and reinstallation of the headlamp assembly, please have the headlamp aiming
checked and adjusted by a qualified technician at an authorized Kia dealer.
 NOTICE
You may occasionally observe light moisture accumulation inside the lamp lens after a heavy rain or a car wash. This
is a normal phenomenon caused by temperature differentials between the interior and exterior of the lamp housing and
does not indicate a malfunction. Generally, this moisture will evaporate as you drive with the headlamps turned on.
If the condensation does not clear or remains persistent, please consult your local authorized Kia dealer to have the
seal inspected.
If you lack the proper tools, the correct replacement bulbs, or the necessary mechanical expertise, do not hesitate
to contact an authorized Kia dealer. Replacing bulbs in a modern Kia Carnival can be complex, often requiring the
removal of surrounding body panels or the entire headlamp assembly for access.
Improper removal or installation of the headlamp assembly can lead to cosmetic or structural damage to your Kia
Carnival. Furthermore, using non-genuine or substandard bulbs can cause electrical shorts, blown fuses, or wiring
harness damage. Relying on Kia Genuine Parts ensures the long-term quality and performance of your vehicle's
electrical system.
Avoid installing unauthorized aftermarket lamps or LED upgrades in your Kia Carnival, as these often lead to
malfunctions, flickering, and significant damage to the vehicle's fuse box and delicate wiring circuits.
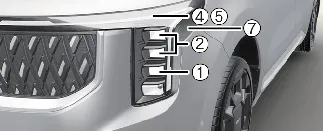
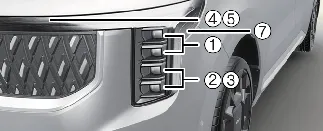
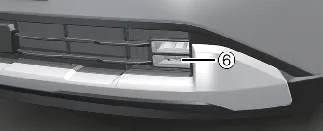
Light bulb position (Front)
Head lamp – Type A
Head lamp – Type B
Fog lamp
-
Headlamp (Low) (LED type)
-
Headlamp (High) (LED type)
-
Sub Headlamp (Low) (LED type)
-
Day time running lamp (LED type)
-
Front turn signal lamp (LED type)
-
Front fog lamp (LED type)
-
Front side marker (LED type)
Light bulb position (Rear)
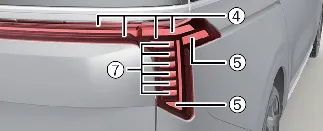
Rear combination lamp - Type A
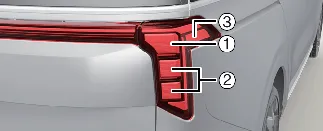
Rear combination lamp - Type B
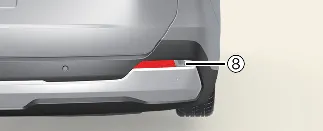
Back up lamp
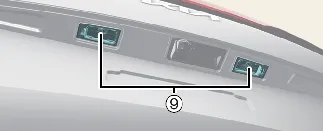
License plate lamp
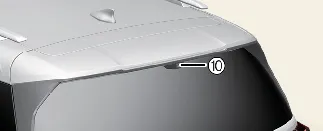
High mounted stop lamp
-
Tail, Stop lamp, and Rear turn signal lamp (Bulb type)
-
Taillamp (Bulb type)
-
Rear side marker (Bulb type)
-
Tail and Stop lamp (LED type)
-
Tail, Stop lamp, Rear turn signal lamp, and Rear side marker (LED type)
-
Back up lamp (Bulb type)
-
License plate lamp (Bulb type)
-
High mounted stop lamp (LED type)
Light bulb position (Side)
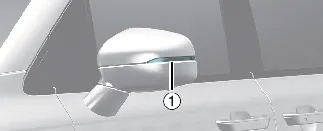
-
Side repeater lamp (LED type)
Replacing lights (LED type)
If an LED lamp unit on your Kia Carnival fails to function, please contact an authorized Kia dealer for professional
inspection. Unlike traditional lights, these LED modules are fully integrated units and cannot be serviced by
replacing individual components; the entire assembly must be replaced if a failure occurs.
We strongly recommend that only a qualified technician handles the diagnosis and replacement of these LED components,
as incorrect handling can damage surrounding electrical wiring or trim pieces of the Kia Carnival.
Replacing tail, stop, turn signal, and rear side marker lamps (Bulb type)
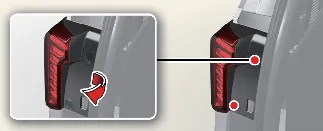
-
Turn off the ignition completely and disconnect the negative (-) terminal from the Kia Carnival battery to
prevent short circuits.
-
Open the vehicle liftgate to access the rear assembly mounting points.
-
Carefully loosen the light assembly retaining screws using a flathead screwdriver.
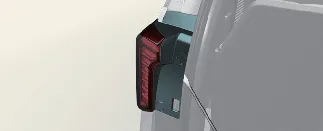
-
Open the designated service cover to gain access to the interior wiring.
-
Gently remove the entire rear combination lamp assembly from the vehicle body.
-
Disconnect the electrical connector from the rear combination lamp assembly.
-
Remove the bulb socket from the assembly by rotating it counterclockwise until the locking tabs align with the
slots.
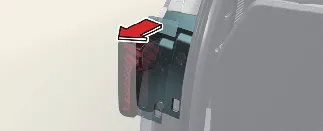
Rear side marker
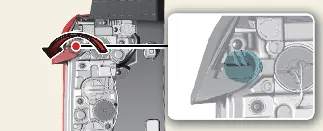
Taillamp
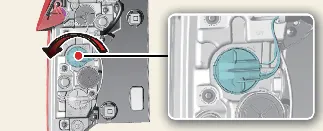
Tail, Stop lamp, and Rear turn signal lamp
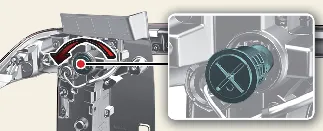
Rear turn signal lamp
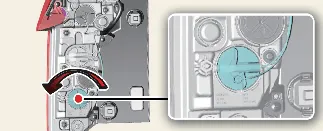
-
Remove the old bulb from the socket by pressing it inward and rotating counterclockwise. Pull the bulb out once
the locking tabs are free.
-
Insert the new bulb into the socket, ensuring it is properly aligned, and rotate it clockwise until it locks
securely into position.
-
Reinstall the socket into the lamp assembly, ensuring the tabs align with the housing slots. Press firmly and
rotate the socket clockwise to lock it.
-
Reconnect the electrical harness and reattach the rear combination lamp assembly to the body of your Kia
Carnival.
-
Finally, close and secure the service cover to complete the replacement procedure.
Replacing reversing lamp (Bulb type)
If you need to replace the reversing lamp bulbs on your Kia Carnival, please follow these steps carefully to ensure
the integrity of the lamp assembly:
-
Turn off the vehicle ignition and disconnect the negative (-) terminal from the Kia Carnival battery to ensure
safety.
-
Carefully remove the rear bumper cover to gain access to the lamp housing.
-
Loosen the light assembly retaining screws using a cross-tip (Phillips) screwdriver.
-
Disconnect the electrical connector supplying power to the rear turn signal and reversing lamp.
-
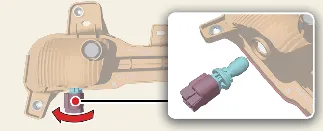
Remove the bulb socket from the assembly by rotating it counterclockwise until the locking tabs align with the
slots on the housing.
Reversing lamp
-
Insert a new bulb into the socket, ensuring it is properly seated, and rotate it clockwise until it locks
securely into place.
-
Reinstall the light assembly into the Kia Carnival body by following the removal steps in reverse order,
ensuring all clips and screws are tight.
Replacing high mounted stop lamp (LED type)
High mounted stop lamp
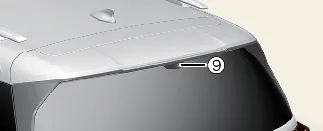
If the high-mounted stop lamp (LED) on your Kia Carnival is not functioning, please have the system inspected by an
authorized Kia dealer. Unlike traditional bulbs, these LED lamps are integrated components and cannot be replaced as
a single bulb. The entire LED lamp unit must be replaced if a failure occurs. It is essential to have a skilled
technician perform this replacement to prevent damage to the vehicle's surrounding body panels, wiring harnesses, or
integrated electronic modules.
Replacing license plate lamp (Bulb type)
-
Turn off the vehicle and disconnect the negative terminal from the battery for added safety during your Kia
Carnival maintenance.
-
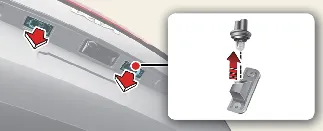
Using a non-marring trim tool or a screwdriver, gently pry the license plate lamp assembly from the bumper or
liftgate panel.
-
Remove the old bulb by pulling it straight out of the socket.
-
Install a new bulb of the correct specification into the socket.
-
Carefully press the lamp assembly back into its original position until it snaps into place.
 CAUTION
Be extremely careful not to smudge, scratch, or damage the lens, the small locking tabs, or the surrounding plastic
housings during the removal and installation process.
Replacing interior lamps (Bulb type)
 WARNING
Interior lamps
Before working on any interior lamps within your Kia Carnival, ensure that the lamp switch is set to the "OFF"
position. This prevents the bulb from heating up while you work, avoiding finger burns or potential electrical
shorts.
-
Turn off the vehicle and disconnect the negative terminal from the Kia Carnival battery.
-
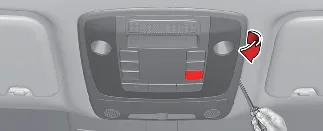
Using a flat-blade screwdriver, gently pry the clear lens cover away from the lamp housing.
-
Remove the old bulb by pulling it straight out of the socket.
-
Push a new, correctly rated bulb into the socket.
-
Align the lens cover and snap it back into the lamp assembly.
 CAUTION
Exercise caution to ensure you do not leave fingerprints on the lens or break the delicate plastic lens tabs when
reinstalling the cover.
Replacing occupant compartment lamp (Bulb type)
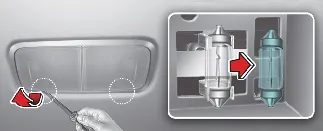
 WARNING
Interior lamps
Always ensure the interior lighting switch is set to "OFF" before beginning any maintenance on your Kia Carnival
cabin lighting to avoid accidental electrical shock or handling hot components.
-
Turn off the vehicle and disconnect the negative terminal from the battery.
-
Gently use a flat-blade screwdriver to pry the lens cover from the occupant compartment lamp housing.
-
Remove the bulb by pulling it straight out of the socket.
-
Insert a new bulb into the socket.
-
Carefully align the lens cover tabs with the notches in the Kia Carnival lamp housing and snap the lens into
its locked position.
 CAUTION
Maintain clean hands and ensure you do not damage the lens tabs or the surrounding plastic trim, as these parts are
essential for the secure fit of the compartment lamps in your Kia Carnival.
Replacing vanity mirror lamp (Bulb type)
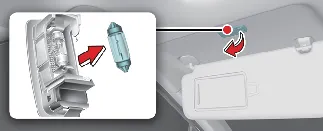
 WARNING
Interior lamps
Before beginning any maintenance on your Kia Carnival interior lighting, ensure the vanity lamp switch is in the
"OFF" position. This prevents the bulb from heating up, protecting your fingers from burns and preventing potential
electrical shorts during the removal process.
-
Turn off the vehicle ignition and disconnect the negative (-) battery terminal to ensure a completely safe
electrical environment for your Kia Carnival.
-
Using a small flat-blade screwdriver, carefully pry the vanity lamp assembly out from the sun visor housing.
-
Gently pull the old bulb straight out of its socket.
-
Insert a new bulb with the correct wattage rating into the socket.
-
Press the lamp assembly back into the sun visor until it clicks securely into place.
 CAUTION
Work slowly and carefully to ensure you do not smudge, scratch, or break the lens, the delicate retaining tabs, or
the surrounding plastic housing of the Kia Carnival vanity assembly.
Replacing glove box lamp (Bulb type)
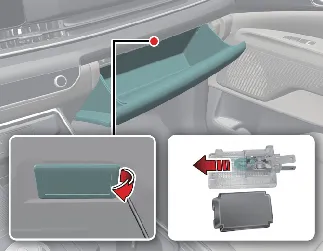
 WARNING
Interior lamps
Always ensure the interior lighting switch is set to "OFF" when working on your Kia Carnival glove box illumination
to avoid accidental electrical discharge.
-
Power down your Kia Carnival and disconnect the negative battery cable.
-
Gently use a flat-blade screwdriver to pry the lamp assembly out from the glove box frame.
-
Remove the protective cover from the lamp assembly.
-
Pull the exhausted bulb straight out to remove it from the socket.
-
Install a new replacement bulb into the socket.
-
Snap the cover back onto the lamp assembly.
-
Reinstall the entire lamp assembly back into the glove box opening.
 CAUTION
Take care to avoid damaging the lens or the plastic housing tabs when performing maintenance on your Kia Carnival.
Replacing luggage lamp (Bulb type)
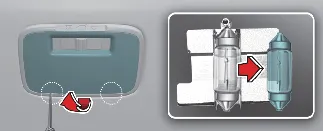
 WARNING
Interior lamps
To avoid receiving an electric shock or burning your fingers on hot components, ensure the luggage area light is
switched off before starting work on your Kia Carnival.
-
Turn off your Kia Carnival and disconnect the negative (-) terminal from the battery.
-
Use a flat-blade screwdriver to gently pry the luggage lamp assembly away from the interior trim.
-
Carefully remove the cover from the lamp assembly housing.
-
Pull the old bulb straight out of its socket.
-
Install a new bulb of the specified type into the socket.
-
Secure the cover back onto the lamp assembly.
-
Press the lamp assembly firmly back into the interior trim until it locks into position.
 CAUTION
Be gentle when handling the lens and tabs to maintain the clean appearance of your Kia Carnival interior.